To use Mojo Launcher, add your Minecraft account, choose a Java Edition version and tap Play. After the game files finish downloading, open a world and use the on-screen controls to move, look around and interact with blocks.
That is the basic process, but the first setup has a few extra steps. This guide walks you through each one, from choosing the correct account to adjusting a control layout. Start with the normal game, confirm it works, then move on to servers or mods.
Before following the screenshots
The app may appear as MojoLauncher or MJLauncher. The example screens show an earlier interface, including a 1.12.2 profile. Newer builds can move or rename menus. Use the matching account, version, controls or settings option in your build; you do not need to install the version shown in a picture.
What Do You Need Before Starting?
Mojo Launcher runs Minecraft Java Edition on Android. It does not turn a Bedrock world, add-on or server into a Java one. Before opening the app, check these basics:
- Android device: Use a phone or tablet compatible with your launcher build. Performance depends on its processor, GPU and available memory.
- Game access: For the full Java game, use a Microsoft account that has Minecraft Java Edition access.
- Internet connection: Initial sign-in and game-file downloads need a working connection. Multiplayer also needs network access.
- Free storage: Leave room for downloaded game files, worlds and any extra resources. A modpack needs more space than a plain installation.
If you have existing worlds on the phone, keep a backup before changing versions or reorganizing game folders. Installing the launcher alone does not add a Minecraft license to your account. If you are changing an older APK, read our older launcher builds and switching guide before replacing your installation.
How to Use Mojo Launcher: Installation and Login
1. Install and Open the App
- Visit our Mojo Launcher APK download page and save the Android package.
- Open the downloaded APK. If Android asks, allow installation from the browser or file manager you used.
- Finish the installation, then open the launcher.
- Let any first-run components finish preparing. Read permission prompts and grant the access needed for the feature you are using.
These installation steps apply to an APK saved on your phone. If you installed the app through an app store, open the installed app and continue with account setup.
If Android refuses an update, read its error before uninstalling anything. Removing an app can also remove its locally stored files. Save important worlds and configurations first.
2. Add Your Microsoft Account
On the launcher screen, open the account area. In the illustrated interface, it is at the upper left. If an account is already selected, tap its name to open the account list, then choose Add account.
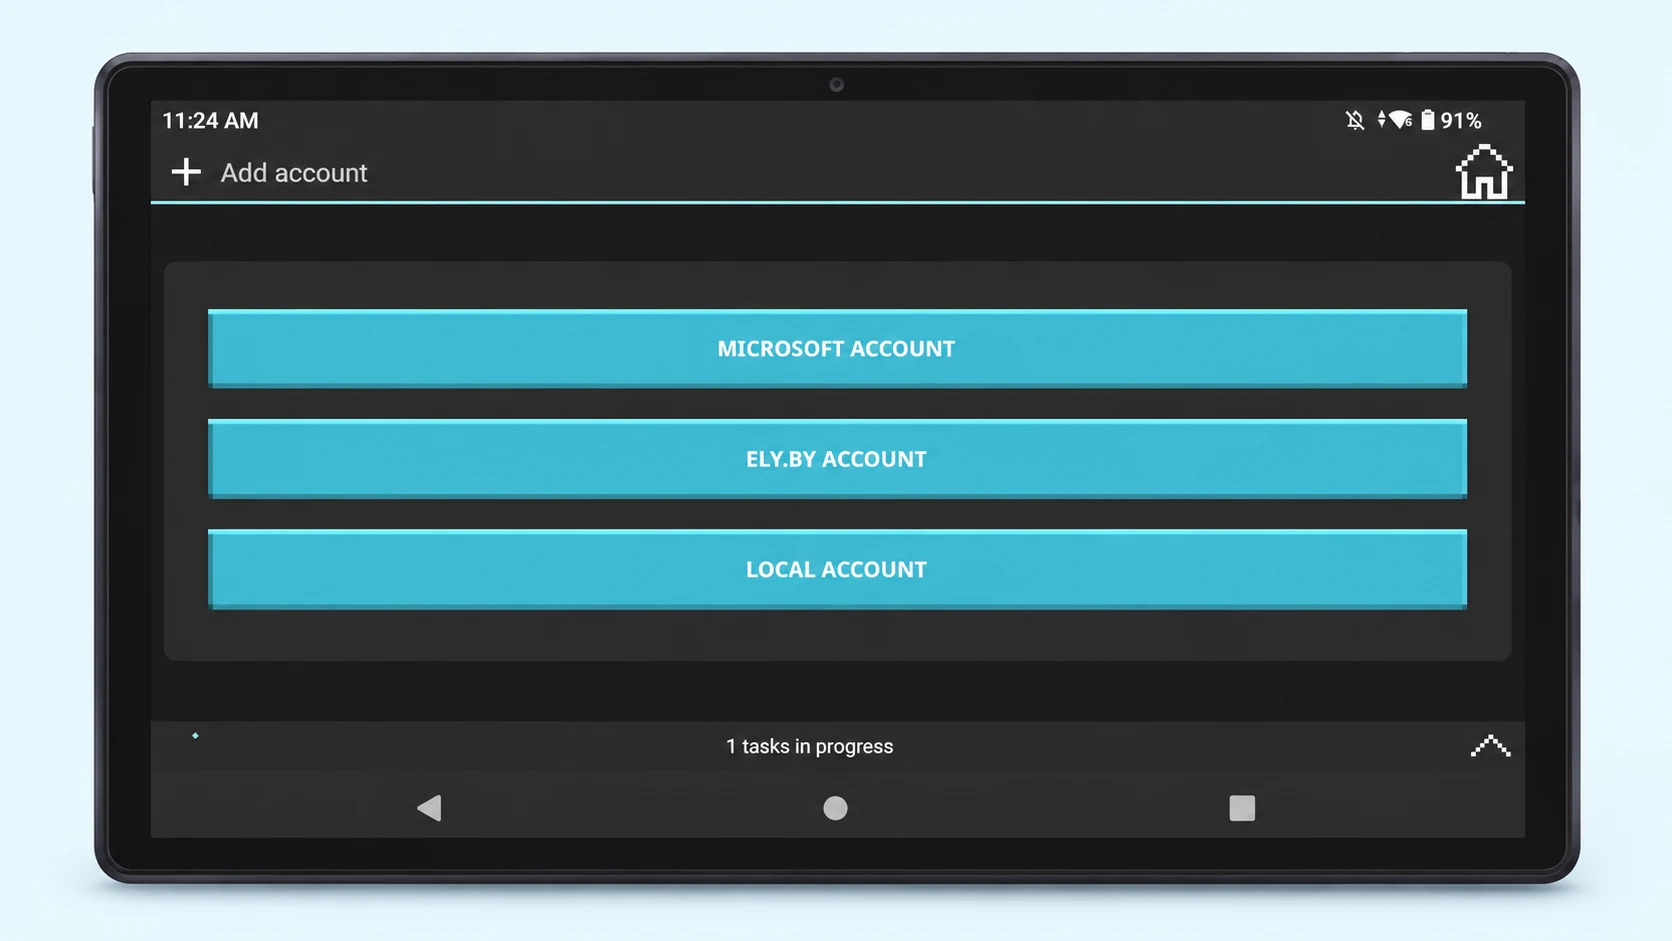
- Select Microsoft Account from the available choices.
- Complete the Microsoft sign-in screen with the account you use for Java Edition. Follow any verification shown during sign-in.
- Wait for authentication to finish and return to the launcher.
- Check that your player profile appears in the account area. Select it before launching Minecraft.
The example menu also shows Ely.by and Local Account options. These are different account methods; choosing either does not grant a Microsoft game license or access to every server. A demo option, where offered, gives limited game access.
Once your account is working, follow our Java skin download and upload guide to change your character’s appearance.
If login does not finish: Check the phone’s internet connection and date/time settings, then retry the account flow. If the game opens in demo mode unexpectedly, confirm that you signed in with the account that actually has Java Edition access.
Choose Your Minecraft Version and Profile
3. Find the Version Controls
Return to the main screen. In the example below, the selected game version is shown along the bottom, with a pencil icon beside the Play button. The pencil opens that profile’s settings. Newer builds may organize this under a version or instance menu instead.
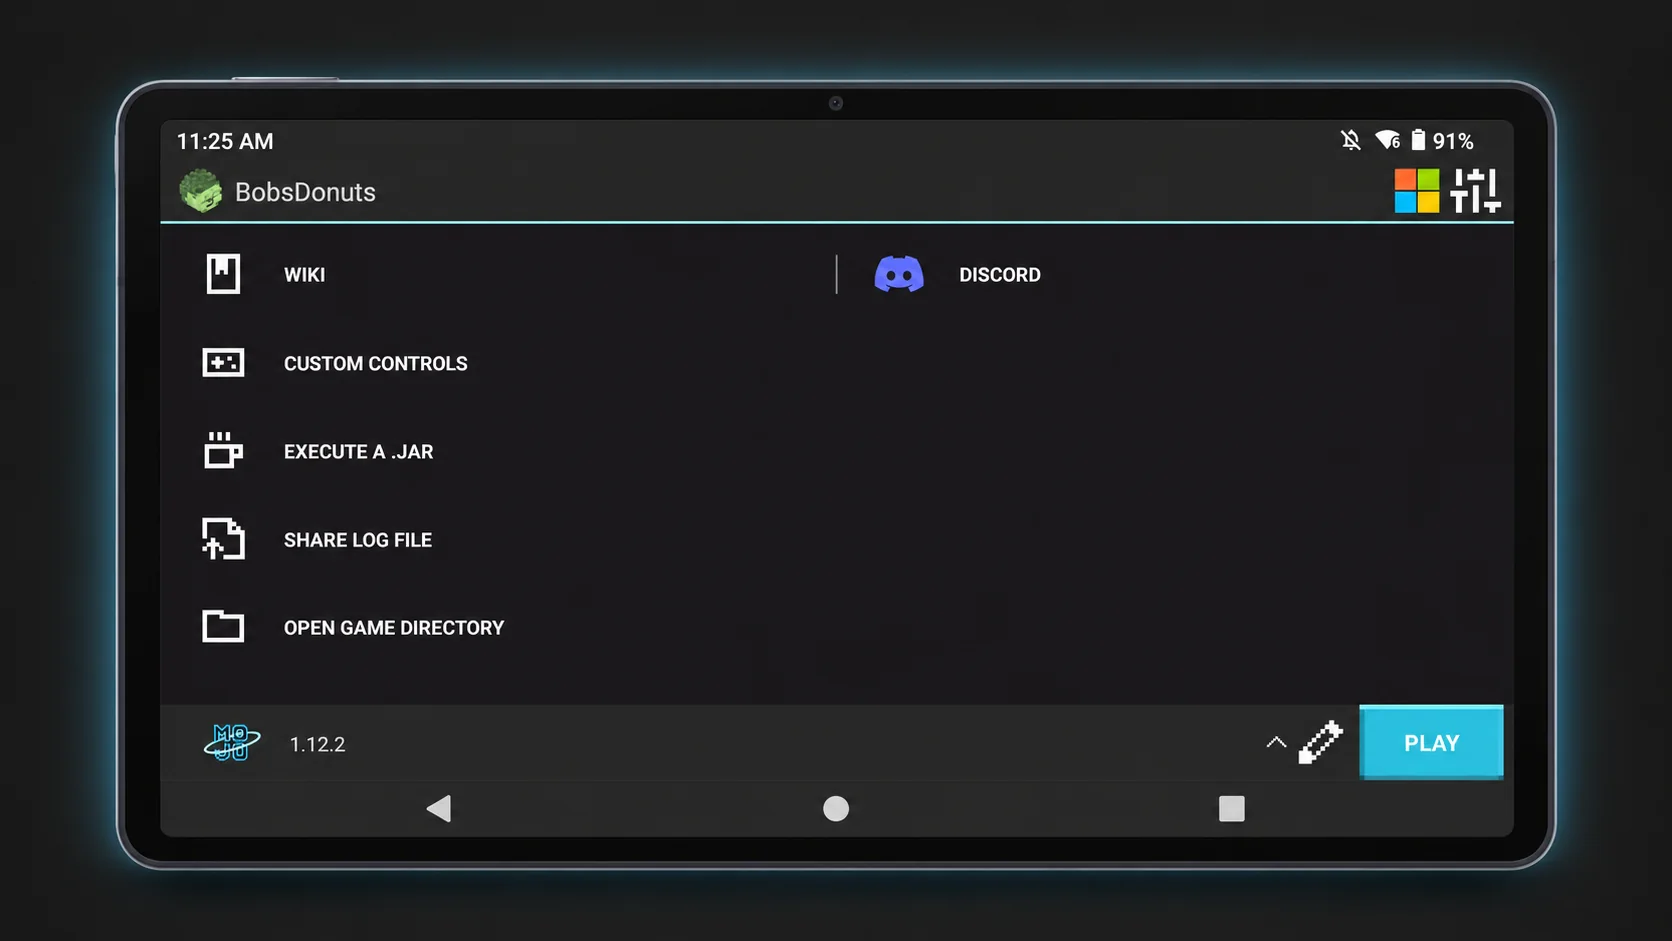
A profile stores launch choices such as the game version and control map. An instance keeps a game setup together and can help separate different versions or modpacks. Check which setup is selected before changing its files.
Understand Shared Data and Instance Folders
In the illustrated profile editor, Shared data (click to switch) changes where the game stores its files. Shared mode uses a common directory; instance mode keeps that setup’s files in its own directory. Choose the mode deliberately before adding worlds or mods, then save the profile.
After launching once and quitting the game, tap Open Game Directory on the launcher’s main screen to see the active folder. In this interface, an instance folder has a generated name, while shared mode opens a shared directory. Its saves folder contains worlds, and resourcepacks contains resource packs. A modded setup can also use a mods folder.
Switching storage modes can make a different set of worlds appear. It does not mean the original saves were deleted. Back up a world before loading it in another Minecraft version.
4. Select a Release and Save It
- Open the selected profile or version settings.
- Find Version. In the illustrated profile editor, tap its SELECT button.
- Choose a standard Minecraft release that your build supports. Start without Forge, Fabric, shaders or a modpack.
- Leave advanced launch options at their defaults for the first attempt.
- Tap SAVE if your interface provides it, then return to the main screen.
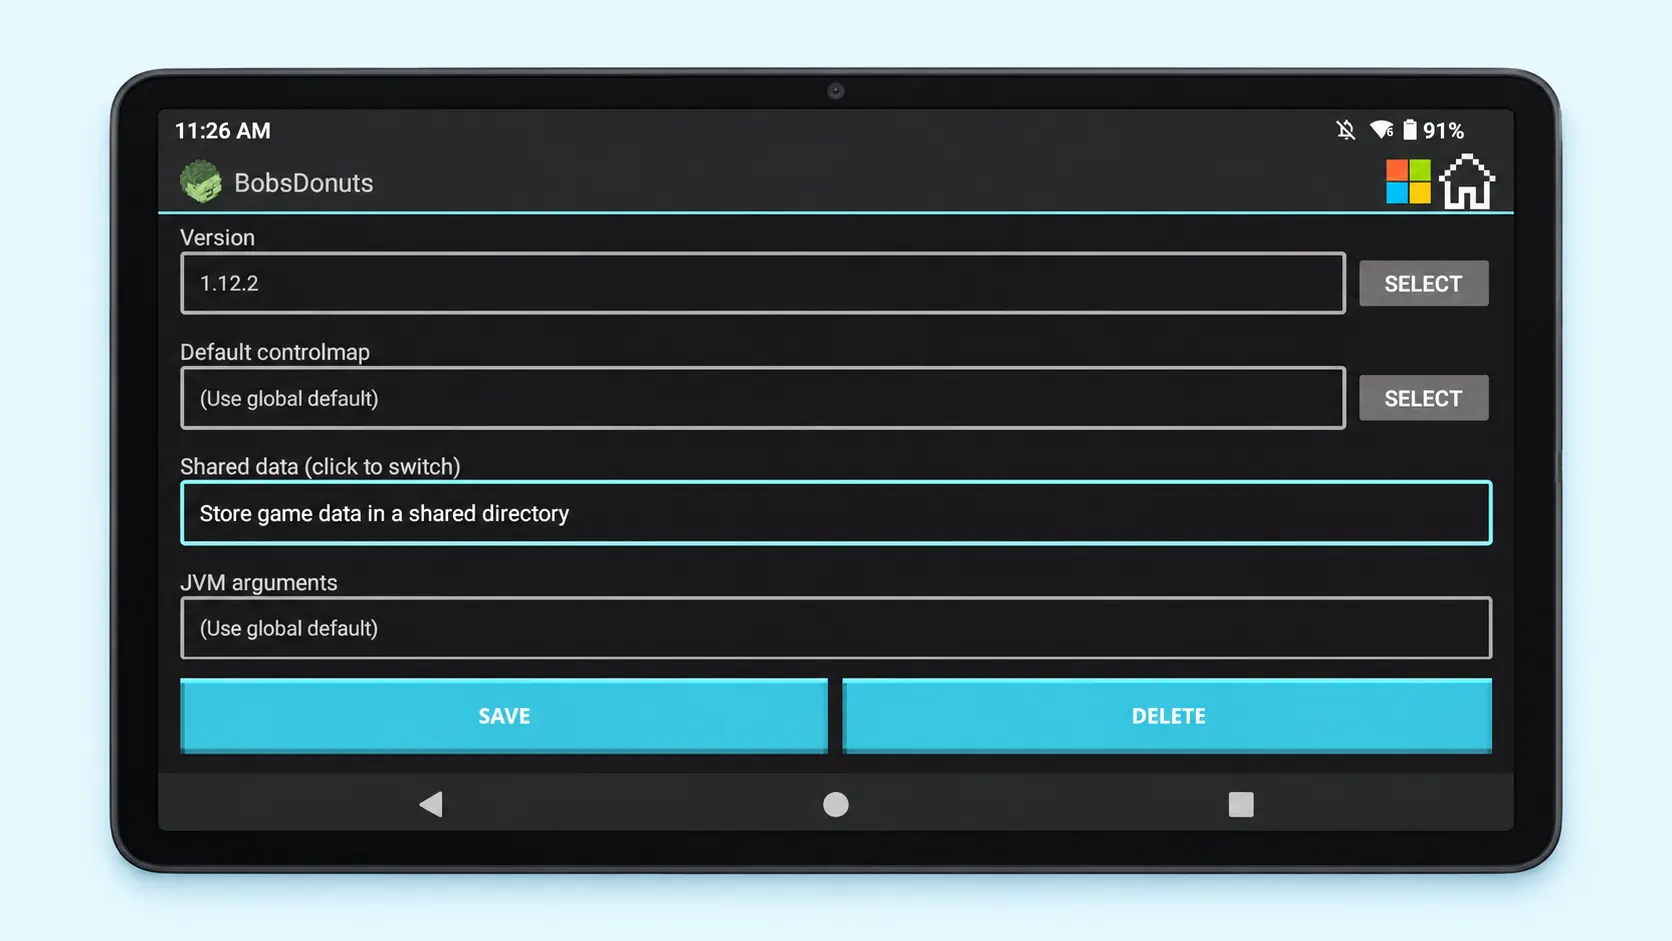
If you want to join a server, choose its required Minecraft version. A newer release is not automatically compatible with an older server. Avoid opening a valued world in another version just to test performance; create a fresh test world instead.
Launch Minecraft and Open Your First World
5. Tap Play and Wait for Preparation
Check the account and version once more, then tap Play. On the first run, the launcher downloads the game’s required files and libraries. Keep the connection active and leave the launcher open while progress is moving.
The first run can take longer than later launches. Repeatedly pressing Play will not make the download faster. If progress stops, check your connection and storage, then retry rather than deleting the whole game directory.
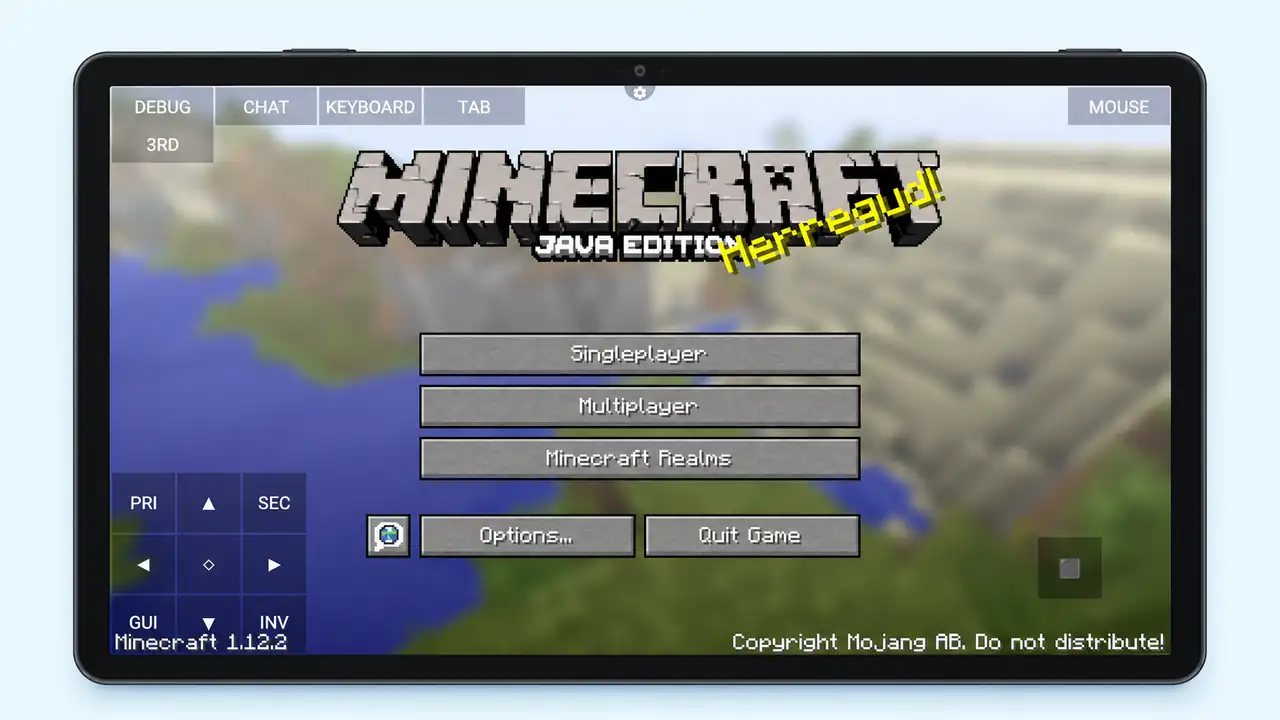
What you should see: The Minecraft Java Edition title screen. Reaching this screen confirms that the selected setup has launched; it does not yet tell you how well a large world or modpack will run.
6. Create a Small Test World
- Choose Singleplayer from Minecraft’s title screen.
- Select Create New World. Wording and the arrangement of world settings vary by release.
- Give the world a recognizable name, such as “Controls Test”. Choose the game mode you want to try; Creative is useful for learning movement without Survival pressure.
- Create the world and wait for terrain to load.
- Test walking, camera movement, jumping and opening your inventory before using an important save.
When you finish, open the pause menu and use Save and Quit to Title, or the equivalent option in your version. Let saving finish before closing the app.
Learn the Touch Controls
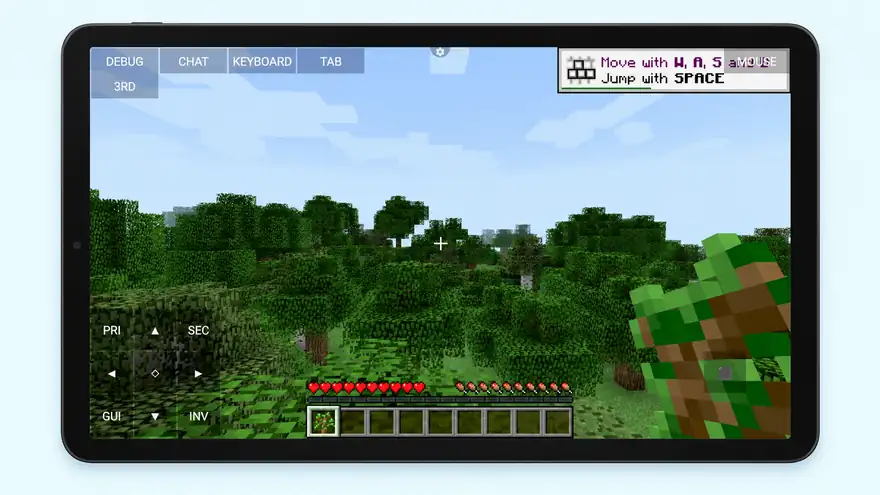
The launcher maps touch buttons to Minecraft’s keyboard and mouse actions. Your layout may look different from the example, so check the assigned action rather than relying only on where a button sits.
| What you want to do | What to use |
|---|---|
| Walk | The directional buttons or movement control on your layout. |
| Look around | Drag in the camera area using the layout’s configured touch mode. |
| Jump | The button mapped to Space/Jump. |
| Break or attack | The primary mouse action, often labelled PRI in older layouts. |
| Place or use an item | The secondary mouse action, often labelled SEC. |
| Open inventory | The inventory button, shown as INV in the example. |
| Type or use chat | The keyboard or chat controls supplied by your layout. |
In Survival, breaking a block normally requires holding the attack action. Placing an item requires a suitable item selected in the hotbar and a valid target. If the wrong thing happens, check the button mapping and the game mode before assuming touch input is broken.
7. Import and Apply a Control Layout
A downloaded layout must be added to the launcher and selected for the game setup. Importing a JSON file and editing individual buttons are separate actions.
- Download a compatible control-map JSON file. If it comes inside a ZIP, extract it first.
- Open the JSON from your phone’s Downloads or file manager. If Android offers a launcher import action, choose it and complete the Import prompt.
- Return to the launcher. In the illustrated profile system, tap the pencil beside Play and find Default controlmap.
- Tap SELECT and choose the imported layout’s JSON file from the control-map list.
- Return to the profile, tap SAVE and launch a test world to check the layout.
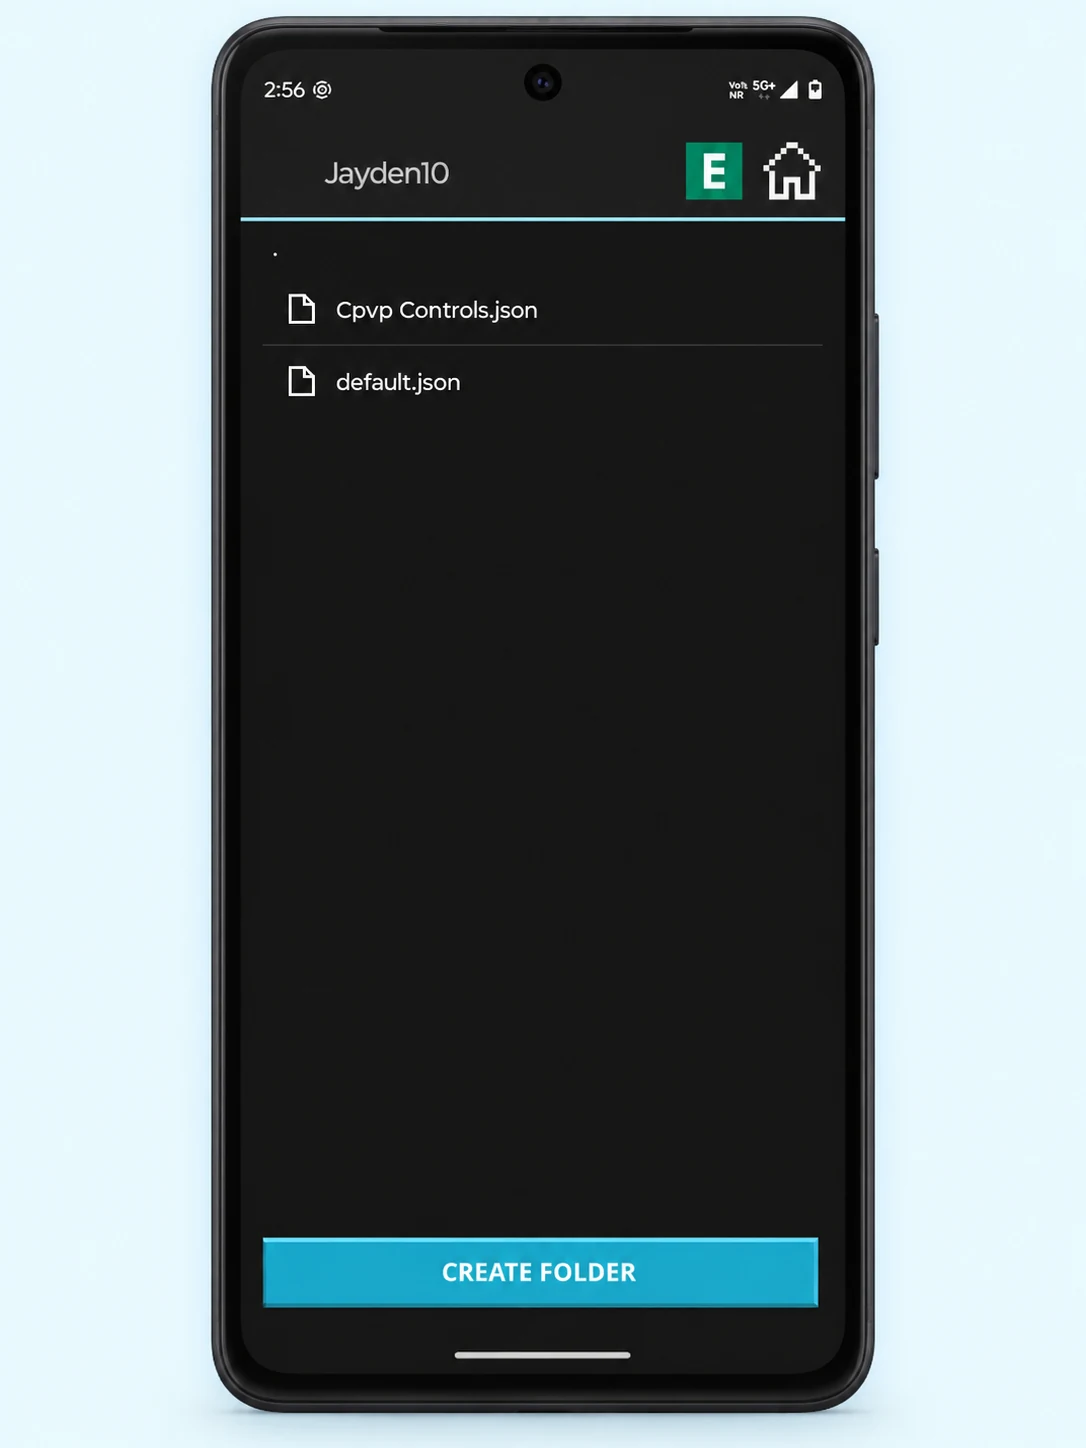
If your build does not offer file import, use its available control-map import or file-copy method. In the illustrated older workflow, a downloaded JSON is copied into the launcher’s controlmap folder before being selected from this list. Use the launcher’s file access rather than guessing a package-specific Android folder path.
Some builds also let you apply an existing layout through Custom Controls → Set default controlmap. Choose the layout, then use Leave editor and save when prompted. The menu may also be accessible through the in-game launcher settings.
Make Your Selected Layout Comfortable
After applying a working layout, use the control editor available in your build if you want to change it. Keep a copy of the original where that option is offered.
- Move frequently used buttons within easy thumb reach.
- Make hard-to-tap buttons larger without overlapping nearby controls.
- Keep room for camera movement in the viewing area.
- Check Jump, Inventory and the two mouse-action mappings after editing.
- Save the changes and test walking and looking around at the same time.
For downloadable layouts and import instructions, follow our Mojo Launcher controls guide. File names and menu positions vary. A layout made for another screen size can need repositioning.
Adjust Graphics and Performance
Start with the default launcher settings. If the game runs slowly, lower demanding options inside Minecraft → Options → Video Settings first. Reduce render distance, use simpler graphics options where available and avoid shaders during the initial test.
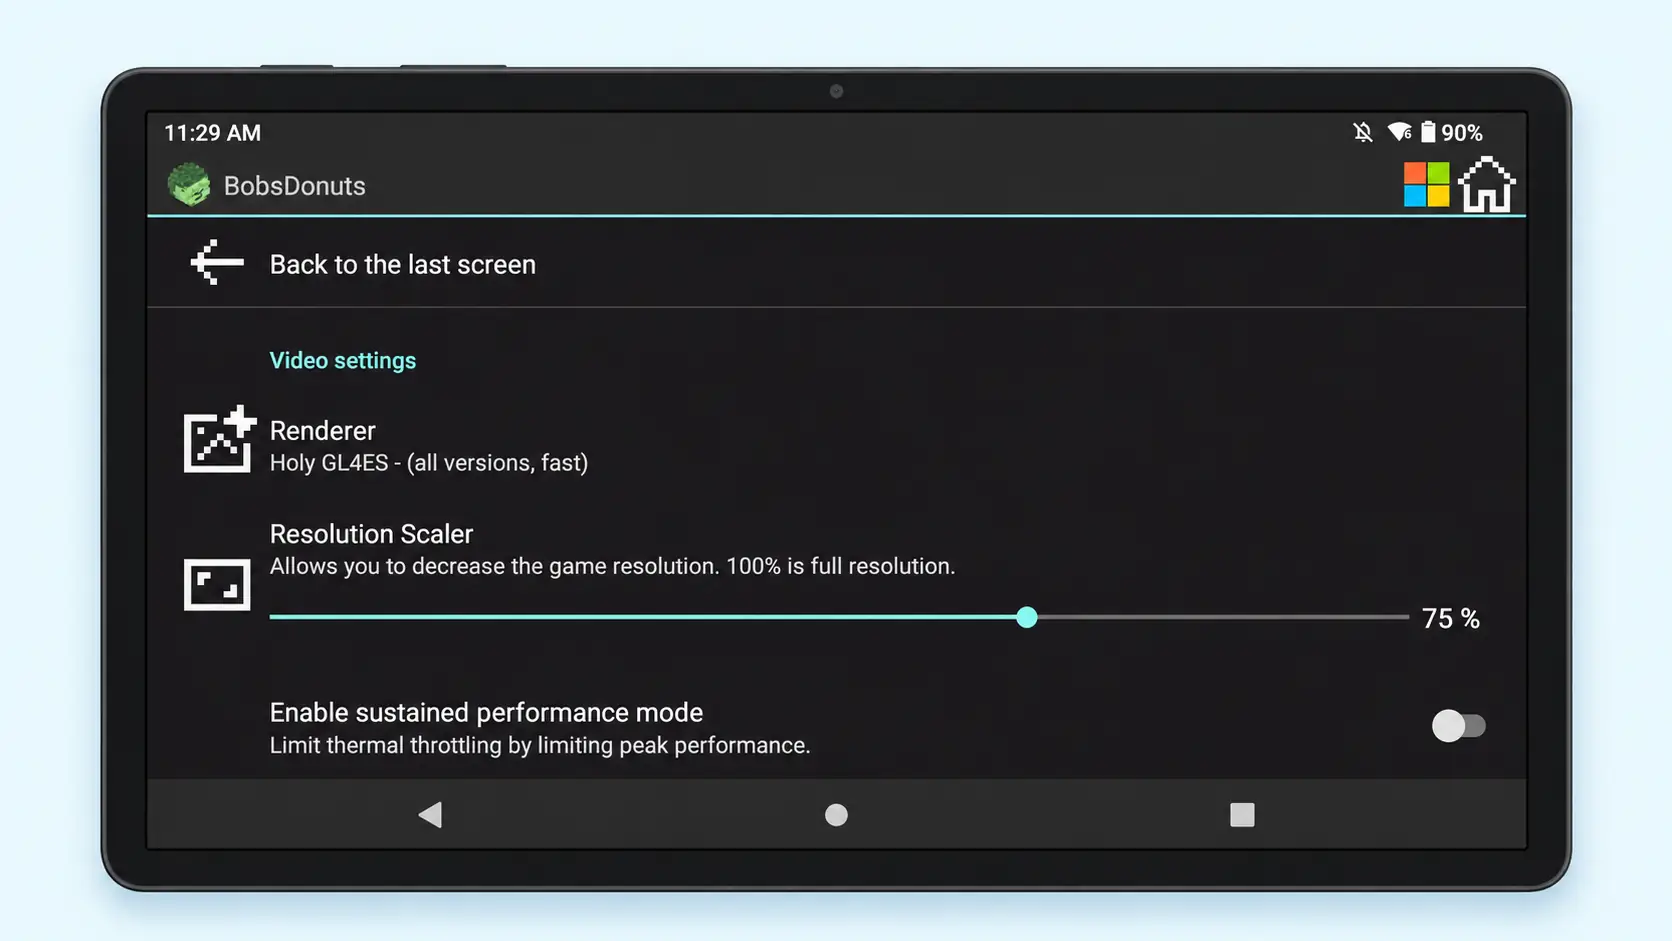
To reach the menu shown above, open the launcher’s settings icon → Video and renderer. This is separate from Minecraft’s Video Settings. Find Renderer and Resolution Scaler there. The renderer handles graphics translation for your device; the scaler changes the resolution used to render the game.
- Change one setting at a time. Return to the same test world so you can compare the result.
- For low FPS, try a lower render distance and a modest resolution reduction. Lower resolution can improve speed but makes the image less sharp.
- For a black screen or graphics errors, check renderer compatibility with your GPU, game version and mods. A renderer that works on another phone may not work on yours.
- For memory settings, leave room for Android. Allocating every available megabyte to Minecraft can make the whole device unstable.
The 75% scaler and Holy GL4ES option in the screenshot are examples from that setup, not recommended values for every device. Keep the Java runtime appropriate for your Minecraft version; changing it at random can create a new launch problem.
Join a Multiplayer Server
- Confirm the server is for Java Edition and check its required version and mods.
- Launch the matching setup, then open Multiplayer in Minecraft.
- Choose Add Server and enter the server name and address supplied by its owner.
- Save the entry, select it and choose Join Server.
If you get a version mismatch, return to the launcher and choose the correct release. If authentication fails, check your selected account and the server’s account requirements. A Bedrock server address will not work as a normal Java server unless that server specifically supports a compatible cross-play setup.
Add Mods Only After the Normal Game Works
The steps below describe a general Java-mod setup, rather than installation of a particular preconfigured client or modpack. Use a separate instance or game directory for a modded setup where possible. This keeps its mods and configuration away from the plain setup you already tested.
- Choose the Minecraft version required by your mods.
- Install the matching Forge or Fabric loader using the method supported by your launcher build. Builds with Execute a .jar can run compatible Java installers.
- Select the installed loader profile and launch it once, then quit.
- Open that setup’s game directory and put compatible Java mod files in its mods folder. Add required dependencies too.
- Launch again with a small set of mods before adding a large collection.
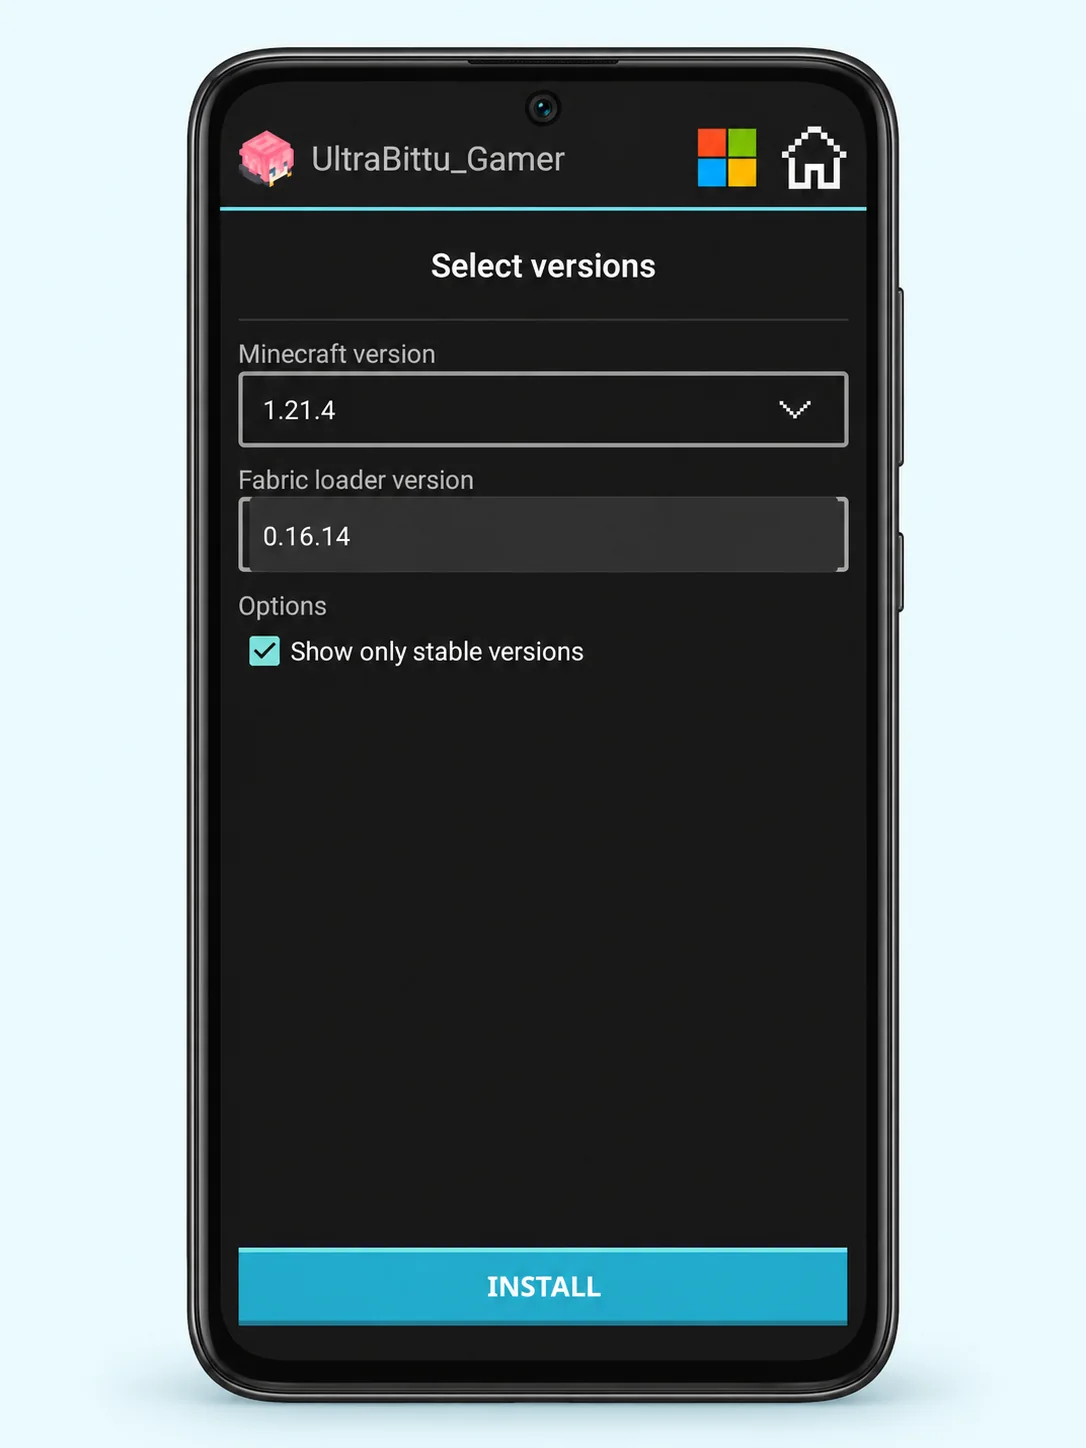
Match the Minecraft version and loader for every mod. Forge and Fabric files are not interchangeable, and Bedrock add-ons are not Java mods. Android renderer compatibility can also limit which Java mods work. Back up worlds before adding or removing mods that change their content.
For an OptiFine resource-pack setup, see our Mojo Launcher Night Vision guide and check its requirements before adding the pack.
Fix Common Setup Problems
Login succeeds, but Minecraft shows the demo
Check the selected Microsoft account and its Java Edition access. Creating a Microsoft account, choosing Local Account or signing into a different skin service does not purchase the game. Complete sign-in again with the correct account if needed.
Play stays on a download or preparation screen
Check free storage and try a stable connection. If the task is still making progress, let it continue. If it has stopped or shows an error, note the message, restart the launcher and retry. Avoid clearing app data as a first step because it can remove local settings and files.
The game closes or shows a black screen
Try the plain game setup without shaders or mods. Check the Java runtime and renderer for the chosen version. If the normal setup works, add modifications back a few at a time. Keep the error message or log so you can identify the failing component.
Buttons appear, but movement or camera input is wrong
Switch back to a known working layout and check the assigned keys and touch mode. If the world is paused or a text field is focused, close that menu before testing movement. Move overlapping controls apart and save the edited layout.
My worlds seem to be missing
Check that you selected the same instance or game directory you used before. Separate setups can have separate saves folders. Do not create replacement files or delete folders until you have located and backed up the original worlds.
If these checks do not resolve the problem, visit our community help guide for what to include when asking about a launcher error.
Frequently Asked Questions
Do I need to install every Minecraft version?
No. Choose the version you want to play. Each extra setup can require more downloads and storage. Use the version required by your world, server or mods.
Can I use my Bedrock worlds and add-ons directly?
They use different formats and systems. This launcher runs Java Edition, so follow Java-specific world and mod instructions rather than dropping Bedrock files into the game folder.
Why does my screen look different from the guide?
Menus change between launcher builds, and the Minecraft menu also depends on the game version. Follow the named account, version, Play and controls functions shown in each step.
Should I reinstall the app when something breaks?
Start by checking the selected account, version, renderer and mods. Reinstalling is not a substitute for finding the cause, and uninstalling can remove local data. Back up your worlds before any reset.